Introduction
Field soil sampling is a key stage in soil-geographic and agrochemical research. It involves specialists traveling to specific areas to collect soil samples for subsequent laboratory analysis. Such work helps assess soil properties, determine fertility levels, contamination, and other important characteristics required for scientific research, agriculture, environmental monitoring, and ecology.
Traditionally, field data is recorded manually in paper field journals. This method poses several challenges: risk of losing or damaging notes, errors during data transcription, and difficulties in coordination between field team members—especially in remote areas. Moreover, tracking routes and the scope of completed work in real time requires substantial organizational effort and can delay data analysis and systematization.
To address these issues, Esri offers a suite of mobile applications specifically designed for fieldwork. One of these tools is ArcGIS Field Maps—a modern mobile application that serves as a full-featured geographic information system (GIS) on a smartphone or tablet. It enables the collection of spatial and descriptive data in digital form, supports offline maps, tracks the location of field teams, and synchronizes with an enterprise GIS system.
In this workshop, we will explore the capabilities of the ArcGIS Field Maps application, learn how to create a form for collecting soil data, and test its functionality on a smartphone.
The skills you gain can be applied to your own datasets using ArcGIS Enterprise, ArcGIS Online, or, in the case of non-commercial research, through the Central Asia and Caucasus Geoportal.
Before the workshop begins, please make sure to download and install the ArcGIS Field Maps mobile app from the App Store or Google Play on your smartphones or tablets.
Registration on the Central Asia and Caucasus Geoportal
The Central Asia and Caucasus Geoportal is a regional Geoportal by Esri that provides personal access to the most advanced features of ArcGIS Online. The use of the Geoportal is permitted exclusively for non-commercial purposes. It serves as a platform for training and hosting open-access data.
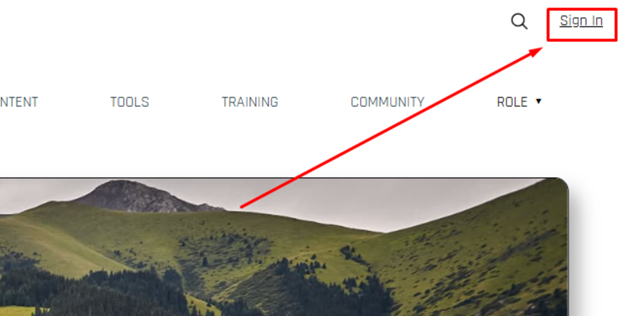
Step 1. Go to the Central Asia and Caucasus Geoportal via the following link: https://www.cacgeoportal.com/
Click the Sign In button in the upper right corner.
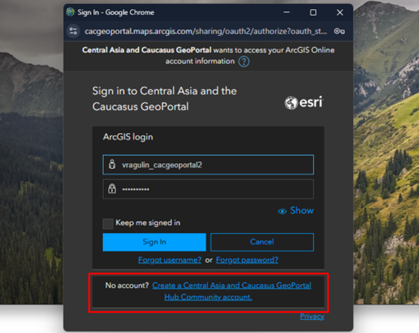
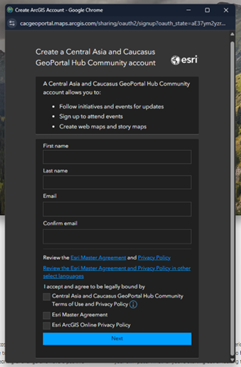
In the pop-up window, click on the link «Create an account with Central Asia and Caucasus GeoPortal Hub Community.»
Fill in the required fields, review the portal’s license agreement and privacy policy, and if you agree, check the corresponding boxes. Then click the Next button.
You will see a notification that a registration link has been sent to your email address.
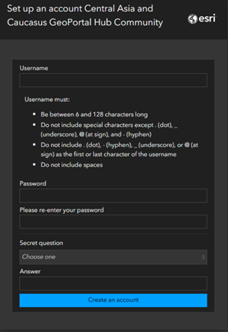
Go to the specified email inbox and follow the link in the message with instructions to activate your account.
Fill in the required fields and click the Create Account button.
You have now successfully created an account on the Central Asia and Caucasus Geoportal.
Preparing a Web Map
To create a form in ArcGIS Field Maps, we need a web map. The web map can either be prepared in advance or created during the form-building process.
For this workshop, a web map titled Soil Sampling has been prepared in advance. It displays sampling point locations with configured attributes. Attribute domains and valid values have also been set. Additionally, a raster layer with a georeferenced soil map has been added.
In this step, you will save a copy of the prepared map to your account so that you can later use it in ArcGIS Field Maps.
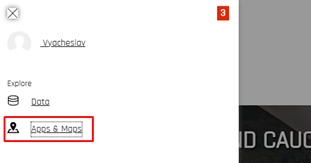
Step 2. Once you’re on the homepage of the Geoportal, click the navigation button (menu icon) in the upper left corner, and then In the side panel that appears, select Apps & Maps.

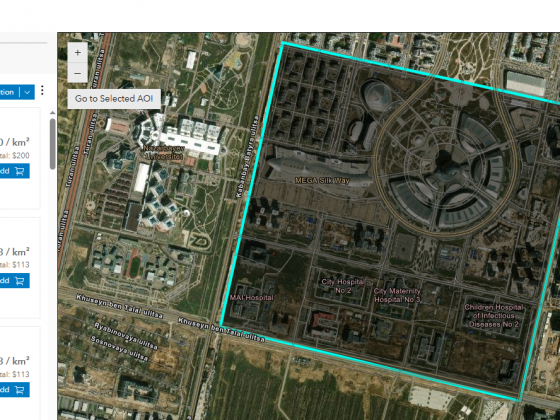
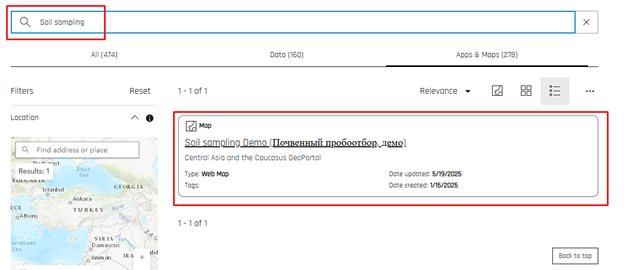
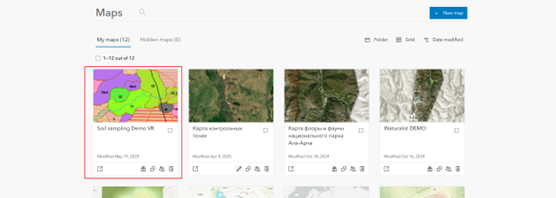
On the opened page, type Soil Sampling into the search bar and click on the Soil Sampling Demo web map.
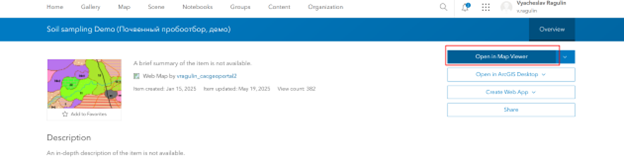
On the left side of the opened map, click More Info Button. Then click the I want to use this button at the bottom of the side panel.

Click Open in ArcGIS Online.
On the item details page, click Open in Map Viewer.
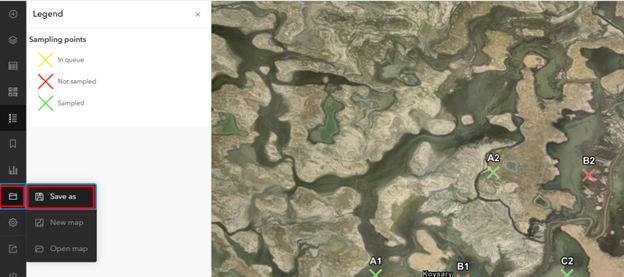
In the Map Viewer, click Save and Open, and in the drop-down window, select Save As.
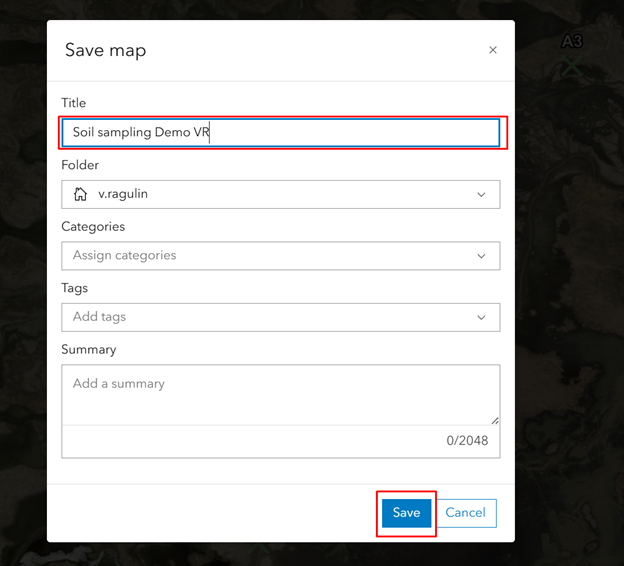
In the Title field, keep the name Soil Sampling Demo and add your initials (e.g., Soil Sampling Demo – AB).
Then click Save.
You will now see that you’re working in your personal copy of the map in Map Viewer, saved under your account.
Getting Started and Offline Map Area creating
In this stage, we will begin working in ArcGIS Field Maps, add the prepared web map as the base, and get familiar with the application interface. Additionally, for further work with the map in offline mode, at this stage we will define an area for packaging.
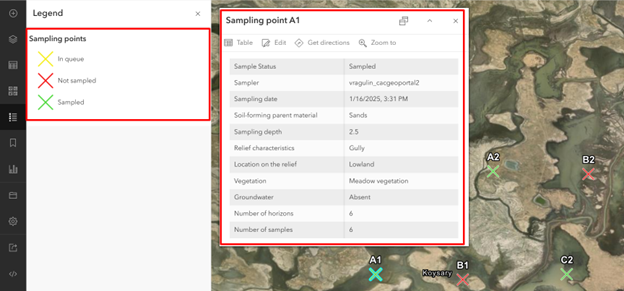
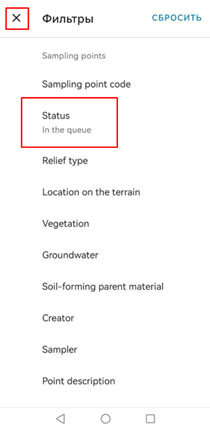
Step 3. Click on one of the sampling points on the map. Review the list of attributes, which include: sampling status, responsible sampler, sampling date, soil-forming parent material, and others.
The symbology of the sampling points is configured based on the status field.
Next, click the Apps button in the top right corner and select Field Maps Designer from the list.

You will be taken to the Field Maps homepage, which allows you to either choose an existing web map or create a new one to prepare your data collection form.
Select the map you saved in the previous step (e.g., Soil Sampling Demo – [your initials]).
You will now see the Field Maps workspace, where data collection forms are built. Let’s break down the key components of the interface.
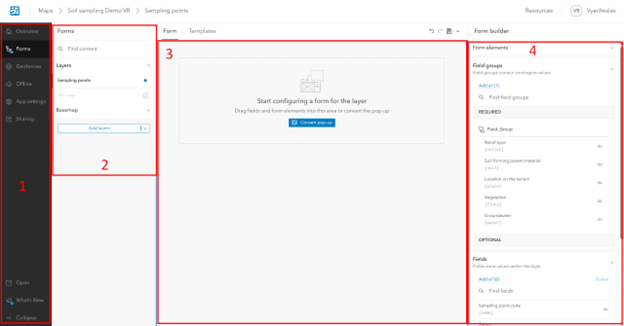
- Sidebar – Consists of several tabs with different purposes, such as: Forms – for setting up the data collection form, Geofences – for defining geographic zones related to field activities, Offline – for configuring offline map access, App Settings – for customizing Field Maps behavior, and more.
- Form List – Displays all editable layers and tables from the map. Only layers/tables with editing enabled will appear here for form configuration.
- Form Canvas – This is what your final data collection form will look like. You will add and arrange form elements here.
- Form Elements List – A set of building blocks used to construct the form (e.g., text fields, date pickers, choice lists). These elements determine how data will be collected in the field.
Go to Offline category on the Sidebar, click on the Map areas tab, and then – on the Manage areas button.

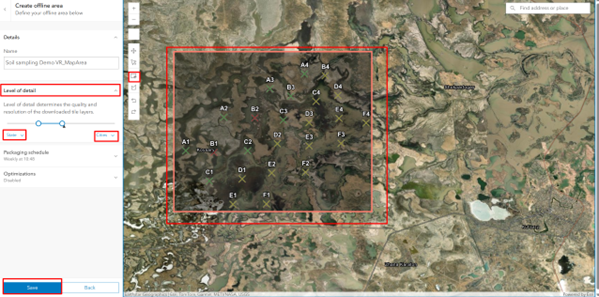
On the opened Manage areas window click on the Create offline area button.
Click the Sketch rectangular map area button located on the left side of the map and define the area containing the points for offline work.
Then, click the Level of detail tab and change the range of resolution to from State/Province to Cities, as shown in the screenshot below.
After that, click Save button.
Note that the Offline map areas list now includes the area we just created. Its status is packaging, as it needs some time for caching.
We don’t need to wait for this process to finish — we can continue preparing the form while packaging runs in the background. Therefore, click the Close button in the upper-right corner of the window.

After that go back to Forms category of the Sidebar.
Adding Form Elements
Our soil sampling form will consist of various elements designed to collect data in different formats. One of the most important criteria for field data collection is speed and clarity.
To make the form easier to navigate, elements can be grouped by topic. Additionally, not all information may be required in certain situations (for example, if sampling isn’t possible). In such cases, Field Maps allows you to control the visibility of form elements using conditional logic.
In this step, we will add elements to the form, organize them into groups, and configure visibility conditions.
Note: Since the feature layer owner is another user, you will not be able to add new fields directly in Field Maps for this workshop.
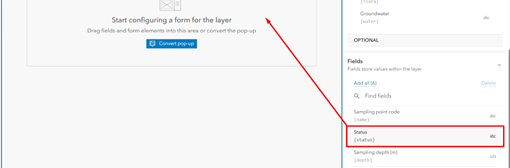
Step 4. From the list of elements on the right side of the application, in the Fields section, find the field Status. Click on it with the left mouse button and hold. Drag the element onto the form canvas. A new element will appear on the canvas.
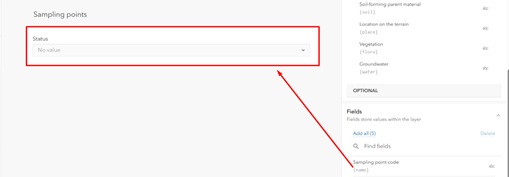
Click on the form title. In the side panel that appears on the right, enter “Sampling Point” as the form title, then click the button to the right of the text input field. From the list of fields, select the field Sampling Point Code. The final result should look like in the screenshot below.

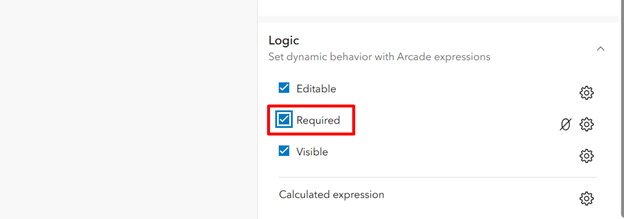
Click on the added Status field element. Scroll down the side panel and check the box next to Required.
Then click on an empty space on the form canvas.
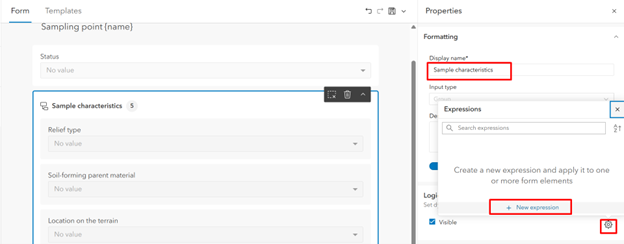
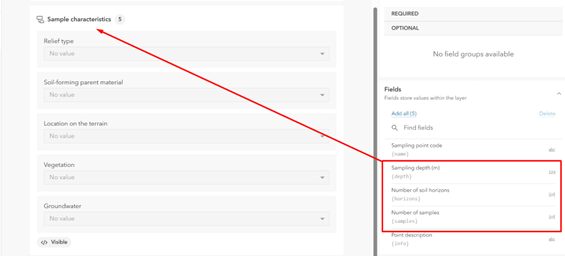
Step 5. In the list of elements, go to the Field groups section and click the Add all button.

In the opened side panel, in the Display name field enter Sample characteristics. Then click the gear button to the right of the Visible option and in the opened window click the New expression button.
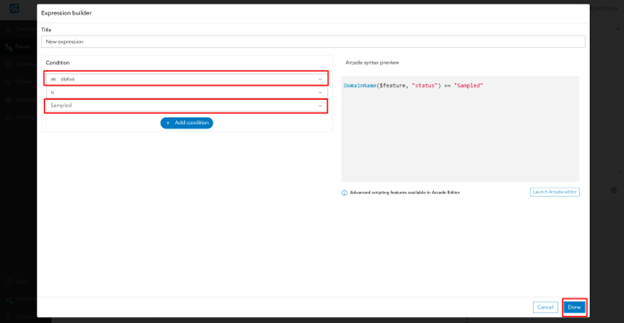
In the expression builder window that opens, select the field status, and for the value – Sampled. Then click Done.
Click on an empty space of the canvas.
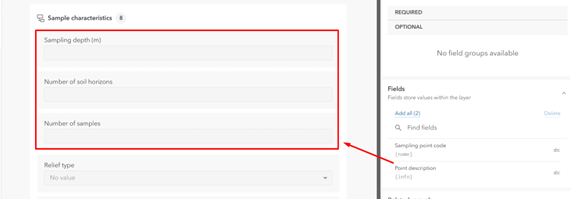
Add the fields Sampling depth (m), Number of soil horizons, Number of samples to the beginning of the Sample characteristics group by clicking and dragging each field into the group.
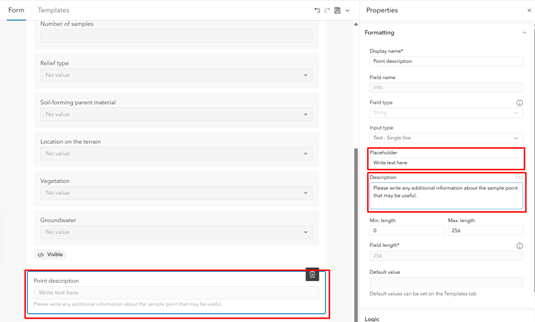
Step 6. Scroll the canvas down and place the field Point description under the Sample characteristics field group.
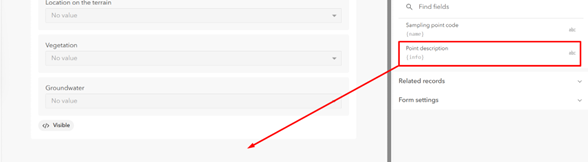
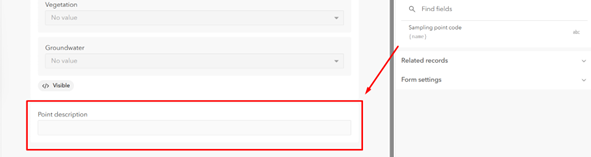
Click on the Point description field and fill in the Placeholder and Description fields in the element settings side panel. For the Placeholder field enter “Write text here”, and for the Description field – “Please write any additional information about sample point that may be useful.”
Click the save button on the map at the top of the application.

Working in the Mobile App
At this stage, we will explore the workflow of the mobile version of the Field Maps app and conduct soil sampling.
To do this, you will need to download and install the ArcGIS Field Maps mobile application on your smartphone or tablet via the AppStore or Google Play.
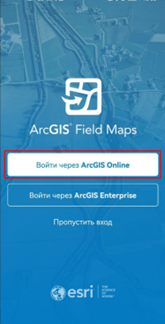
Open the ArcGIS Field Maps app on your mobile device and log in using your Geoportal account.
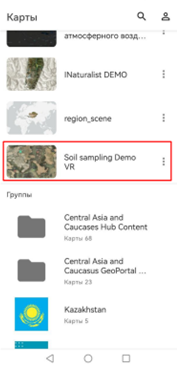
From the list, select the map you prepared in the previous steps. As you can see, our offline map area is ready to use. You can check it later – for now, to save time, choose the online map.

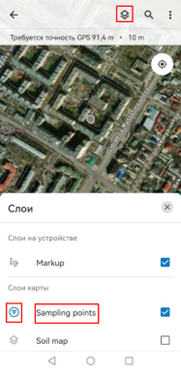
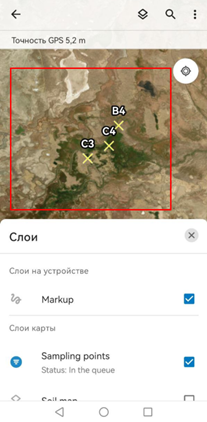
Tap the Layers button at the top of the application, then tap on the Sampling points layer to zoom into it. After that, you can tap the filter settings button to the left of the layer name.
To configure filters, select the required field and values. You can add multiple filters this way, but we will limit it to a filter on the Status field with the value In queue. Then close the filter settings and make sure the sampling points are filtered accordingly.
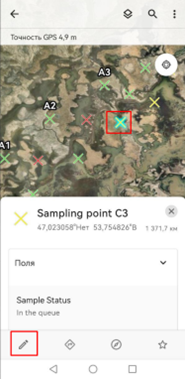
Select the desired sampling point by tapping on it, and press the edit button in the lower left corner.
Check how visibility settings work depending on the value of the Status field, how dependent values and attribute domains function, and also try attaching a photo to the sampling record.
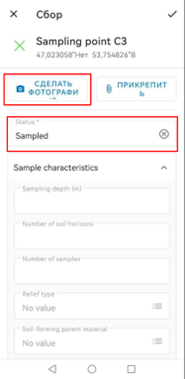
Once you’ve finished entering the data, tap the checkmark in the top right corner to complete the sampling.
Conclusion
Thus, with minimal time investment, we have prepared a convenient data collection form for soil sampling. Based on the web map, you can also create a fieldwork monitoring dashboard using the ArcGIS Dashboards application. An example of such an application is available at the following link: https://bit.ly/44LdyaF.
You can get inspired by practical examples of using mobile applications via the following links:
- Blog article “Use Cases of ArcGIS Mobile GIS Applications”: https://blogs.esri-cis.com/2023/03/30/mobile-gis-use-cases/
- Use of ArcGIS Field Maps for marine research: https://youtu.be/onhNUdr51HU?si=OlsNOwzg3PO8Apgk
- Lessons on using Geoportal applications: https://youtube.com/playlist?list=PLyb5x8bh6bNmo5_kPyJlUGPKdJqCbZHH_&si=9zjrlh7ERj5LMkkf
To enroll in instructor-led ArcGIS training courses, you can register through the Data+ International training center at the link below:
https://www.esri-cis.com/ru-ru/training/home